Understanding Subfloor Replacement: How to Inspect & Decide
Your home’s subfloor helps ensure your flooring is stable, level, and comfortable to walk on. Hidden beneath your finished surface (such as hardwood, laminate, or tile), the subfloor is a core structural layer that often goes unnoticed—until it begins to fail. Knowing how to identify problems with your subfloor can help you prevent bigger issues, save money, and maintain a safe living environment. Below, we explain the primary signs of a failing subfloor, what causes damage, when you might need a full or partial replacement, and how the replacement or repair process works.
What Is a Subfloor and Why Is It Important?
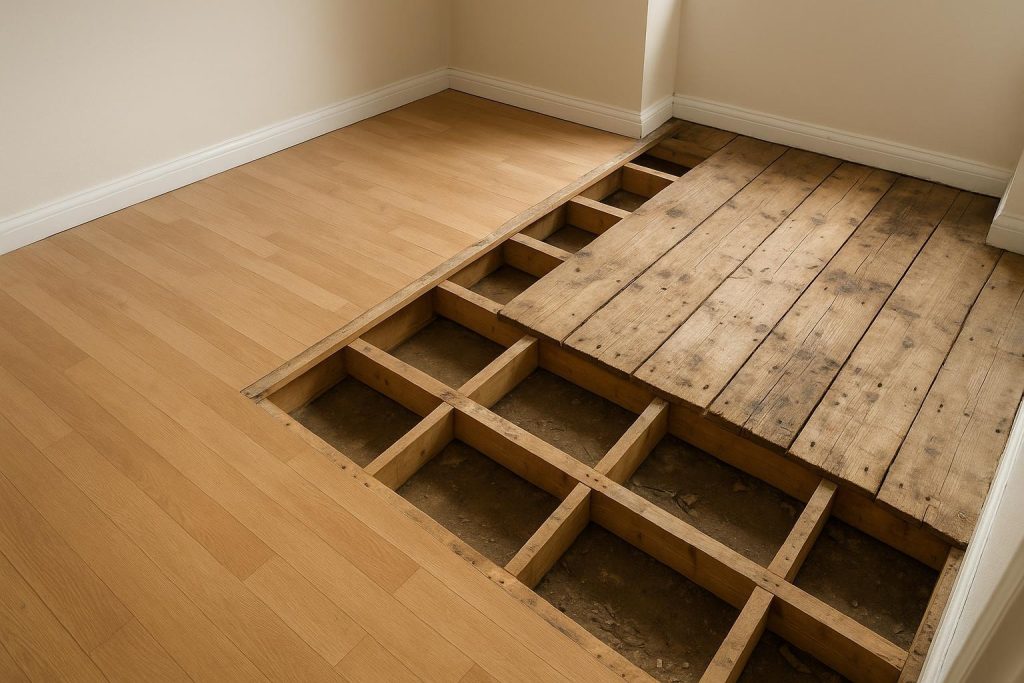
A subfloor is typically constructed from plywood or oriented strand board (OSB) panels. Installed directly over the floor joists, it provides a sturdy surface to support the finished floors, furniture, and people walking around. If the subfloor is compromised, the end result can be uneven or bouncy floors and ongoing structural problems. Some of the core functions of a subfloor include:
- Load Support: It bears the weight of everything in the room, including people, furniture, and appliances.
- Base Layer: Whether you have carpet, tile, hardwood, or laminate, the subfloor offers structural backing so your top layer remains level and correctly fitted.
- Moisture Barrier: Many modern systems also incorporate an underlayment or moisture barrier to protect the subfloor from spills, leaks, or humidity.
Because it’s mostly hidden from sight, a subfloor can slowly deteriorate without you noticing. By the time warping or sagging appears at the flooring level, the damage beneath may be significant.
Common Signs Your Subfloor Needs Replacing
Subfloor issues can reveal themselves in various ways. Below are some clear red flags.
- Excessive Squeaking or Creaking: All floors can squeak occasionally, but if the noise is loud and persistent across large sections, the subfloor might be weakening or coming loose from the joists.
- Visible Sagging or Dip in the Floor: A telltale sign of structural damage is a noticeable sag or dip in certain areas. This could be caused by moisture damage, rotted wood, or general wear over time.
- Spongy or Bouncy Feel: Does the floor feel soft, bouncy, or less solid underfoot? This often indicates the subfloor beneath is compromised.
- Persistent Musty Odor or Signs of Mold: Moisture trapped within flooring layers can lead to mold growth. If you detect a constant damp or musty smell, it’s worth checking the subfloor.
- Water Stains, Warping, or Rot: Water leaks from plumbing, appliances, or roofing can warp the subfloor. Over time, dampness can cause wood-based subfloors to rot, losing their load-bearing ability.
- Cracks in Tiling or Grout: If the floor covering above is cracking but the tile itself was installed correctly, it might be a sign that the base layer (subfloor) isn’t stable.
Take any of these warning signs seriously. Catching a failing subfloor early can save you stress and money, rather than discovering structural issues only after they’ve advanced.
Why Subfloors Go Bad: Common Causes
Several factors contribute to subfloor deterioration. Some of the most frequent issues are:
- Moisture and Water Damage: Leaks, spilled liquids that soak into the floor, or persistent humidity can eventually lead to soft, rotted wood. Bathrooms, kitchens, and laundry areas are at especially high risk.
- Excessive Weight or Traffic: Heavy furniture or surprisingly frequent foot traffic can place extra strain on the subfloor, causing it to loosen or crack.
- Poor Initial Installation: If the subfloor wasn’t installed correctly—perhaps the panels weren’t properly secured or the incorrect thickness was used—it might deteriorate more quickly.
- Age and Natural Wear: Even with careful installation, wood products have a limited lifespan. After years or decades of use, the material can develop small cracks or gaps.
- Lack of Ventilation: Subfloor areas with insufficient airflow, typically in older homes, can trap moisture and quickly lead to mold and mildew.
Inspecting a Potentially Damaged Subfloor
The first step to confirming subfloor damage is a visual inspection. If you suspect problems, here are a few steps you can take:
- Check the Flooring Surface: Take note of any bulges, dips, or cracks in the floor as you walk around. Run a hand over transitions between rooms to check for slight height differences that could indicate subfloor issues.
- Look from Below (If Possible): In some homes, you can inspect the underside of the subfloor from the basement or crawl space. Keep an eye out for discoloration, mold spots, or signs of rot.
- Probe for Soft Spots: With a flat-blade screwdriver, lightly press chewing-gum levels of pressure into wood you suspect might be rotting. If it easily sinks in, that reveals deterioration.
- Use a Moisture Meter: Home improvement stores offer affordable moisture meters you can use to detect moisture within wood. High levels often indicate an active leak or ongoing moisture problem.
While you can perform some preliminary checks yourself, it’s often wise to consult a professional if you notice extensive damage, mold growth, or questionable structural integrity. A knowledgeable contractor can determine if a subfloor requires partial repairs or a total replacement.
The Risks of Ignoring Subfloor Problems
Overlooking a failing subfloor doesn’t just cause squeaky floors—it can compromise the overall safety of your home. If the wood is rotted or structurally unsound, there’s a danger of parts of the floor buckling entirely under pressure. Additionally, mold or mildew trapped between layers of flooring and subfloor can harm indoor air quality, which is particularly concerning for individuals with allergies or respiratory issues. Addressing these problems sooner rather than later is always better.
When to Repair vs. Replace
The decision between a simple repair and a full replacement often depends on how widespread the damage is and whether rot has set in.
- Small Problem Areas: If only a few sections are spongy or slightly damaged, a partial replacement or patch might be enough.
- Extensive Rot or Moisture Damage: When much of the subfloor is compromised, it’s often more efficient and safer to remove the old material entirely and install brand-new panels.
- Underlying Structural Concerns: If your floor joists or beams are also damaged, additional repairs might be necessary so the new subfloor sits on a stable framework.
A professional assessment will help you pinpoint which route is best. Keep in mind that if the root cause (like a plumbing leak) isn’t solved, new materials can quickly succumb to the same fate.
The Subfloor Replacement or Repair Process
While every home is different, most subfloor repairs or replacements follow similar steps:
- Remove Flooring & Trim: The existing floor covering in the affected area is taken out, whether it’s carpet, tile, or wood. Baseboards and trim around the room may also be removed to allow for easier access.
- Assess Condition: The subfloor is inspected thoroughly from above once the top layer is gone. Any sections that are visibly wet or rotted are identified.
- Cut Out the Damaged Sections: If you’re handling a spot repair, only the damaged area is cut out of the subfloor. If the damage is too extensive, the entire subfloor might need to go.
- Dry & Treat If Necessary: If moisture caused the damage, it’s crucial to let the space fully dry out to avoid trapping moisture under the new subfloor. Antimicrobial treatments can also help prevent mold.
- Install New Panels: Using the appropriate-grade plywood or OSB, the contractor secures fresh sheets over the existing joists. Joints must be tight, and the edges should align with the joists or intermediate blocking.
- Secure & Reinforce: Screws are typically used instead of nails for a tighter, squeak-resistant fit. In some repairs, additional blocking or sister joists might be introduced to support new subfloor edges.
- Lay Underlayment (If Required): For certain finish floors—like tile—an additional cement backer board or other underlayment might be installed before re-laying the final flooring.
- Reinstall Flooring & Trim: Once the subfloor is secure, the top floor goes back on, neatly finishing the job.
This step-by-step approach can be disrupted if the damage is severe or if other structural issues are uncovered, but it generally outlines how a typical subfloor replacement moves forward.
Balancing DIY Efforts vs. Professional Help
Removing small sections of damaged subfloor might be within the capabilities of some do-it-yourself enthusiasts, especially if you’re comfortable with carpentry tasks. However, there are a few considerations:
- Safety & Structural Knowledge: Subfloors tie directly into joists and other structural elements. If you’re not certain how to maintain the integrity of the floors, it’s better to call in an expert.
- Tool Requirements: Cutting out old subfloor, replacing it properly, and ensuring a snug fit often demand power tools, safety gear, and a suitable workspace.
- Time & Effort: Even small subfloor patches can be time-consuming, especially if you end up discovering more damage than anticipated.
- Finish Floor Involvement: If you’re handling tile, hardwood, or other materials that require precision, the subfloor must be perfectly level and secure before reinstalling floors.
Professional subfloor replacement or interior demolition is a common add-on request for contractors who handle renovations and property cleanouts. If you have a larger project, you can consider hiring a service that takes care of everything from tear-out to final cleanup. For instance, a team like The Junk Guys can help remove and haul away discarded materials, making it easier to install a new subfloor without clutter.
Disposing of Old Subfloor Materials
After tearing out subfloor panels, you typically have piles of wood, nails, and debris that need to be disposed of. This often isn’t as simple as placing everything on the curb. Some municipal regulations require specific handling of construction materials. In these cases, Interior Demolition professionals or junk removal providers can simplify the process. They’ll ensure the debris is taken away, so you don’t deal with the headache of hauling it yourself. This not only saves you time but also helps you avoid the risk of injuries that can happen when moving heavy, jagged scraps.
Preventive Measures for a Healthy Subfloor
Once you’ve replaced or repaired your subfloor, you’ll likely want to avoid repeating the same situation. Here are some best practices to keep your new subfloor healthy for years to come:
- Control Moisture: Quickly mop up spills, fix leaks, and maintain proper ventilation in areas like bathrooms and kitchens.
- Reinforce High-Traffic Areas: Place protective mats or rugs in doorways, hallways, or zones that see constant foot traffic. This precaution helps minimize wear on both the finished floor and the subfloor below.
- Inspect Periodically: Every so often, check beneath sinks and around appliances like dishwashers or washing machines. Catching leaks early prevents the subfloor from getting saturated.
- Use Adequate Underlayment: When installing new floors—especially tile—correct underlayment helps distribute weight and protect the subfloor.
- Manage Humidity: Try to keep indoor humidity levels in a normal range. Extremely damp conditions can push moisture deeper into the wood.
Practicing these habits ensures your subfloor remains stable for decades—even if you decide to switch out the finish flooring for aesthetic reasons later.
Estimated Costs & Considerations
The overall cost of subfloor replacement depends on factors like materials used, project size, and local labor rates. If you hire a removal or demolition service, factor in disposal fees too. When budgeting, keep these points in mind:
- Scope of Damage: Replacing an entire subfloor across multiple rooms will obviously cost more than patching a small area.
- Material Quality: Higher-grade plywood or OSB panels come at a slightly higher price, but they can offer better resilience over time.
- Possible Upgrades: While the subfloor is open, you may choose to add extra insulation, reinforce joists, or improve soundproofing. These additions can raise the initial cost but often pay off in comfort and durability.
- Professional Labor: Skilled labor ensures the job is done right the first time. Improper installation can lead to repeated squeaks or worse structural issues down the line.
For accurate estimates, consult local contractors or home improvement professionals. They can assess the unique details of your property, discuss possible solutions, and provide a budget-friendly approach.
Wrapping Up: A Solid Base for Your Home
Learning how to tell if your subfloor needs to be replaced is the first step to maintaining a safe and comfortable home. While a failing subfloor can be alarming—especially if it’s causing noticeable sagging, squeaking, or mold—it’s a solvable issue. In many cases, a targeted repair in just one section can make all the difference. But if the damage is extensive, don’t be surprised if a full tear-out is recommended. This is actually a great opportunity to start fresh, ensuring your floors will be stable and structurally sound for years to come.
Ultimately, if you see or suspect warning signs like soft spots, musty odors, or water damage on the underside of your floors, it’s wise to investigate. Taking timely action prevents safety risks, keeps your home on a solid foundation, and protects your property value. Whether you handle it yourself or hire a professional, prioritizing a healthy subfloor is one of the best ways to ensure a sturdy, comfortable home environment in the long run.